How I code on my Chromebook!
October 30, 2013
NOTE: This blog post was migrated from my old Wordpress blog!
I love to code, and spend as much time as I can working on personal or university projects, for a while now I have used my Macbook Pro for development, this was running Linux Mint and my text editor / IDE of choice was Sublime Text 2. I recently received my new HP Chromebook 11, and had to find a new way to work on my coding. Whilst I was an intern at Google I relied on internal tools to code on my Chromebook, but these are not available to the public. At the moment I am working mostly with Appengine so this post will focus on the development of Appengine Apps.
I tried a couple of different solutions to this problem, the second best solution for me being Codenvy. Codenvy works with Appengine straight out of the box, you can run a development server and deploy directly to Appengine. The IDE is also pretty full featured offering integration with git and many more features, but I personally found it a bit clunky and in some places it lacks important features (such as being able to view the development server’s logs!).
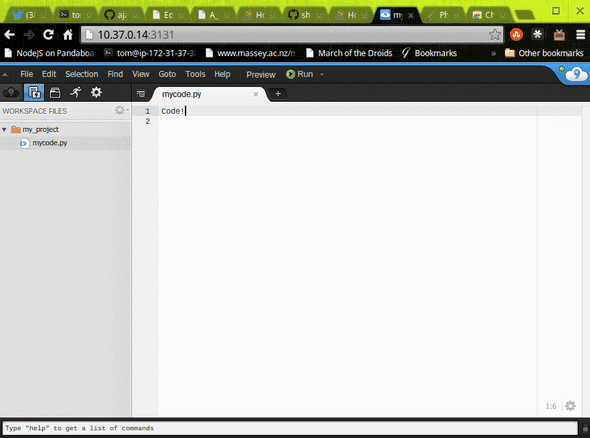
I ended up settling for Cloud9 as my IDE of choice. It not only has a huge expanse of features, but it’s pretty, theme-able and for me, just feels right! There are two ways to use Cloud9, the normal way is to go their website, sign up for an account and start coding away. However, this is not the only choice, you can also grab the code from their GitHub repository and run it yourself! By default the normal Cloud9 does not offer Appengine integration, but you can deploy directly to appengine using git.
I’m a massive Linux fan and therefore chose to run Cloud9 on a cloud server using Amazon’s EC2. This means that I can connect to my server via SSH to start Appengine development servers and deploy code via command line as well as edit the code stored there using Cloud9. The Amazon EC2 instance that I am using is running Ubuntu 13.10, and I plan to try installing this on one of my Raspberry Pis too.
Here are the steps that I took to get Cloud9 up and running:
1. Install the requirements:
sudo apt-get install git npm libxml2-devThis should install all the requirements including nodejs. There a quite lot of packages to be installed so it may take a little while.
2. Add a symlink pointing nodejs to node.
When trying to complete step 3 I got the error “sh: 1: node: not found”. This is due to there being a package for ubuntu, unrelated to nodejs, called node, therefore node is installed as nodejs. To resolve this we can simply create this symlink:
sudo ln -s /usr/bin/nodejs /usr/bin/node3. Grab cloud9 and install it!
git clone https://github.com/ajaxorg/cloud9.git cd cloud9 npm installThis should create a folder called cloud9 and set it up! You may see some warnings during the install process, these are mostly warnings about readme files and can be ignored.
4. We’re done! Give it a test!
To star cloud9, we need to run cloud9.sh which is located in the ‘bin’ directory, you can do so by running the following command:
bin/cloud9.sh -w ~/my_project/-w is the root folder of the code that you want to edit
By default cloud9 will only listen on localhost, you can either forward the local port using Secure Shell (you can see my configuration here) or you can run cloud9 with the -l argument:
bin/cloud9.sh -w ~/my\_project/ -l 0.0.0.0However, be aware that anyone will be able to access cloud9 if you start it like this, see the documentation here for information on available authentication methods.
Finally, some info on my setup!
To run the appengine development server and deploy to appspot I simply use the scripts provided in the sdk.
One other thing I have done is to create a Chrome Bookmark app, pointing to my cloud9 instance, this simply allows me to launch it in it’s own window, rather than as a tab. If you want to do the same you can grab the unpackaged app from here, extract it, change the link next to “web_url” to the url for your cloud9 instance, then go to chrome://extensions/, click “Load unpackaged extension…” and click on the folder containing the files.
Enjoy!
